Dinosaur Activities for Pre-Schoolers


Laura @inspiremyplay
Founder of @inspiremyplay, Early Years teacher for 11 years and mummy to three gorgeous girls. I'm passionate about the benefits of play in early childhood.

Benefits of Small World Play
Children naturally love small worlds play and can learn almost anything through their play with small world resources. Not only does it nurture their imagination, it also enables them to explore new materials, act out scenarios from real life, build language, practice social skills and gain an understanding of the world around them.
Whether you're setting up a dinosaur land, seashore or farm there are so many great options to bring small world play to life and ignite children's senses at the same time. The use of natural resources in small world play promotes the use of all fine senses, provides chances for classification and sorting, and promotes the use of descriptive language - all crucial language and numeracy skills for young children. Natural resources can help children become more interested in, and knowledgeable about, the natural world they live in. Giving children a stimulating, constantly-changing environment to explore helps to foster their curiosity, encourage creative thinking, and give them chances to ask questions.
You can find out more about the benefits of small world play in my Resources for Play series which will help you to prioritise a few key resources that can be used in multiple set-ups and activities. I've also put together a range of options for resources and supplies to go specifically with the PlayTRAY based on different interests and themes.
Dinosaur Chia Seed Slime
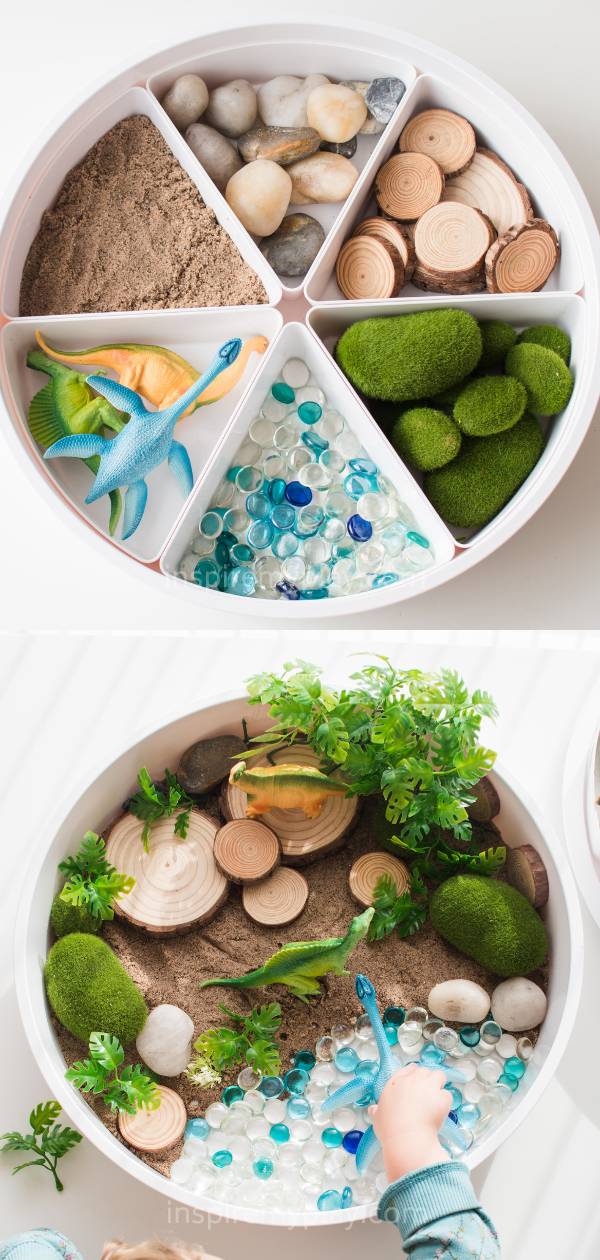
Dinosaur Small World
We used kinetic sand for the base of this particular tray, but play dough would work too or even chickpeas - one of our fave sensory bases!
Top resources to add:
- Wood slices - these are often sold for craft projects but work so well for small world play
- Large pebbles/rocks
- Artificial vegetation - we tend to buy plants for fish tanks or terrariums from a pet shop
- Glass stones - these are useful as water. Only use these with older children as they can be a choking hazard. Substitute with a piece of blue fabric for younger ones
- Artificial moss rocks - we love these for small world play! Link in my Amazon storefront if you want them
- And dinosaur figures of course!

Taste-Safe Foam Dinosaur Swamp
Chickpea water, also known as Aquafaba, whizzes up into the most amazing foam, making it a brilliant early sensory play experience and an excellent taste-safe alternative to bubble foam. It lends itself to lots of different themes or you can just give them some tools and bowls to explore it with!
To make this taste-safe foam simply drain the water from two tine of chickpeas, add a teaspoon of cream of tartar, a drop of food colouring if you like and whizz into a foam! The cream of tartar helps to keep it foamy for longer but if you don't have any it's not absolutely essential.
You can keep chickpea water in the fridge until you're ready to do this activity but it does really need to be whizzed up just before you play, as it starts to turn back to a liquid after awhile. You can always revive it though with another whizz if need be!

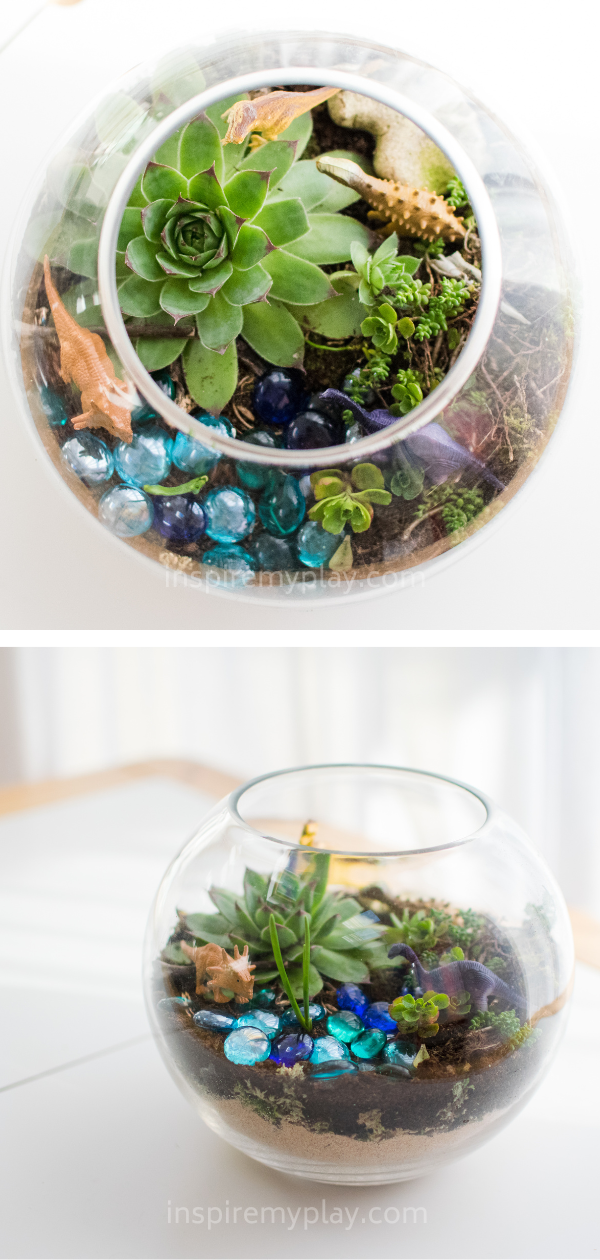
Dinosaur Terrarium / Small World
We wanted to make a couple of terrariums for our house so I thought it would be fun for the girls to make their own dinosaur-themed ones too. You could easily switch up the theme for fairies for a jungle perhaps.
To make this we started with a layer of sand at the base. We then added a layer of pebbles, followed by moss and soil on top.
The girls chose some succulents to plant and then decorated their own with stones and glass pebbles, before adding the dinosaurs. These are now sitting proudly on their windowsill!
Fizzy Dinosaur Swamp
The vinegar / bicarb reaction is a favourite in our house right now! The girls have loved exploring with their own concoctions but it's also a fun one for a little tray set up too!
I set up this dinosaur scene with a layer of bicarbonate of soda in the bottom of our PlayTRAY and then gave them some vinegar coloured with a bit of food colouring.
They had great fun using the vinegar to turn it into a swamp for the dinosaurs and then telling little stories with the dinosaur figures.
The girls did look a little green at the end but it's nothing a bath can't sort out.


Dinosaur Fossils
There's a couple of ways you can make these salt dough fossils. The simple way is to take some toy dinosaurs and print their bodies or footprints into the salt dough. This works really well for little ones. I knew Miss 6 would want to be a bit more creative so I gave her some craft resources to create her own skeletal structures by making marks and printing. She loved doing this!
To make salt dough mix 4 cups of plain flour, 1 cup of salt and 1.5 cups of warm water together in a bowl. Knead together to make a soft dough. If it's too dry, add a little more water. Use plain flour and put them in the oven on a low heat until they are dried out thoroughly. If you don't have plain flour to hand you can use self raising flour and leave them out in the sun for a few days to dry.
I buried ours in a tray of sand and they've loved using the brushes to reveal the fossils. It's inspired lots of other play and has been a great one just to leave outdoors for them to return to.


Dinosaur Potato Printing
Not a small world activity but this is a great quick dinosaur themed activity nonetheless and such an easy way to create potato stamps for printing!
Halve a potato and press a cookie cutter into it.
Turn the potato on its side and then cut through the potato to remove the parts around the cutter.
Finally, remove the cookie cutter and you'll be left with a perfect shape for stamping!
Frozen Dinosaur Eggs
When the weather gets hot we always turn to ice play! These ice dinosaur eggs are the perfect way to cool down. They're nothing new but it's such a good one! Mine love to role play little stories whilst they are breaking them free and the best thing about this is it takes a decent amount of time to complete.
To make frozen dinosaur eggs you'll need some small dinosaur figures and balloons.
This is what you need to do:
- Blow up your balloon and stretch it out as much as possible, then let the air out again.
- Stretch the opening of the balloons and place a dinosaur inside each one.
- Put the balloon over a tap, fill it up with water and tie.
- Place the balloons in the freezer, being careful they're not squashed against each other, otherwise they'll lose their egg shape.
- Once they are frozen you can peel off the balloons and they're ready for play!
- Provide warm water in squeezy bottle or spray bottles, and tools to crack the eggs open.


Get your FREE ebook
For more simple DIY recipes & ideas for sensory play at home download your Beginner's Guide to Sensory Play by subscribing to Inspire My Play today.